Quick protocol
Step 1Make targeting vector containing your transgeneEach insertion site has a specific vector and an injection strain that is compatible with that targeting vector. See plasmids and injection strains for info.
Step 2Maintain injection strain on HB101 bacteria at 20 degreesHealthy worms are much easier to inject and result in higher insertion frequencies. Maintain unc-119 strains at 15C or 20C.
Step 3Make injection mixUse 10-50 ng/ul of targeting vector and add co-injection markers (pCFJ601 @ 50 ng/ul, pMA122 (optional) @ 10 ng/ul, pGH8 @ 10 ng/ul, pCFJ90 @ 2.5 ng/ul, pCFJ104 @ 5 ng/ul). If necessary, add DNA ladder for a total concentration of 100 ng/ul. High-quality DNA may improve insertion frequency
Step 4Inject animalsPlace one, two or three animals on each seeded plate. Put the injected animals at 25C until they starve out completely (~ 1 week).
Step 5Heat-shock injected animals (optional)If you added the negative selection marker pMA122, you can kill (most) array animals by a two hour heat-shock at 34C in an air incubator. Array animals are dead approximately 4 hours after heat-shock.
Step 6Screen for mosSCI insertionsScreen plates for animals that move like wildtype worms but do not have any of the red co-injection markers. Pick a couple of non-fluorescent, rescued animals to a new plate.
Step 7Single and characterize insertionHomozygose the insertion starting from a single, clonal animal. Characterize and verify insert in enough detail for your particular experiment (this ranges from just verifying fluorescence of a reporter strain to more elaborate molecular methods to verify that the full transgene was inserted).
Detailed protocol
Background
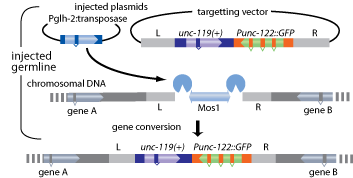
The basic principle of Mos1 mediated Single Copy gene Insertion (MosSCI) is based on the mosTIC technique developed by Roberts & Bessereau (2007). We’ve added selection markers to facilitate insertions, selected standardized genomic locations for insertions and generated a number of cloning vectors for sub-cloning or Gateway cloning. We mainly selected Mos1 insertion alleles in intergenic regions between the 3’ regions of two genes facing each other. The sites were selected to avoid disrupting predicted genes and promoters; however the gene predictions are continuously updated so make sure we didn’t pick a site in the middle of your favorite gene. We have not detected any overt phenotypes in strains carrying either the Mos1 insertion or genes inserted by MosSCI. However, please keep in mind that we have not done extensive cellular or behavioral characterization of strains carrying insertions at these loci. Most insertions will be full length single copies. But some will be duplicate insertions, will contain small deletions or insertions or will have secondary Mos1 hops in the background. We suggest treating each insert as you would treat separate alleles.
Gene insertions are generated at the targeted locus by repair of the double stranded break after Mos1 excision. Mos1 excision is induced by expression of Mos1 transposase. The break can be repaired by homologous recombination between the broken ends and sequences on an extrachromosomal array (see Figure 1, below). For efficient homologous recombination to occur we used 1.5 kb of homologous sequence to each side of the Mos1 insert.
We have developed two complementary approaches to generate insertions. 1) Direct insertions 2) Selection based insertions. Both approaches are based on a using cb-unc-119 as the positive selection marker to identify inserts. This requires that transgenic lines are made in the unc-119 background. In Erik’s lab we exclusively use the direct insertion protocol with the negative peel-1 selection.
Direct injection vs Selection-based insertion
Direct insertions
Mos1 transposase is expressed under the eft-3 promoter and the Mos1 transposon is excised in the injected animal. Insertions are identified visually in the F2-F3 progeny of injected animals based on unc-119 rescue but the absence of fluorescent co-injection markers. With the peel-1 selection this screening can be done without a fluorescent microscope with approximately 10% false positive rate (you may need to optimize the negative selection – in our lab it only works in the incubator that has an internal fan). This method has the advantage of being quick (approximately a week) but requires more injections than the heat-shock based insertion protocol.
Selection based insertion
For this method, we rely on two selection markers to recover integration events: A) Co-integration of a cb-unc-119(+) rescue fragment provides a positive selection marker for identifying extrachromosomal and integrated transgenes. B) A temperature-sensitive twk-18 construct provides negative selection against the extrachromosomal array thus distinguishing integrations from extrachromosomal arrays (Kunkel et al., 2000). The negative selection is achieved by expressing a dominant, temperature sensitive K+ channel in the body wall muscles. Worms move normally at 15°C, allowing the extrachromosomal array to be propagated. When shifted to 25°C, the worms carrying the extrachromosomal array are paralyzed, allowing for selection of integration events. This method is slower (approximately a month) and requires more hands-on time as well as reagents. It has the advantage that it can be easily scaled and may therefore be preferable for large or for toxic transgenes. Please note that we do not use the selection based method in the lab anymore.
Direct injection protocol
- Direct insertion protocol
Preparation for experiments
To generate transgenic animals by MosSCI the transgene needs to be inserted into vectors that regions complementary to the genomic target site and the cb-unc-119 rescue fragment. See a description of the reagents to find the appropriate vector.
We have routinely injected miniprep quality DNA. However, Morris Maduro has noticed that higher quality DNA results in more transformed F1 animals and it is therefore likely to improve insertion frequency. We recommend using midi-prep quality DNA for the co-injection markers (since you will only make those vectors once) and miniprep DNA for the targeting plasmid, with an additional ethanol precipitation of the miniprep DNA.
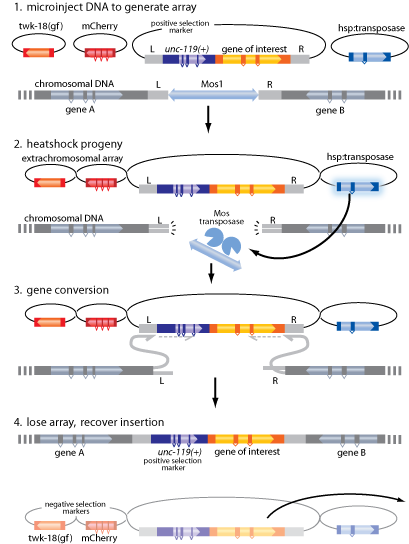
Direct insertions rely on insertion of transgenes in the germline of the injected P0 animal. Expression of the Mos1 transposase is achieved in the germline under the eft-3 promoter. Insertions can be identified in the F2-F3 progeny based on 1) unc-119 rescue, 2) survival of heat-shock with the peel-1 toxin, and 3) absence of co-injection markers.
A week before injection you will need to pick injection strain animals for injection. After injection it takes approximately 7 days before you can screen for inserts. There are few experimental manipulations in this waiting period. In our experience, the frequency of successful insertions will depend on several factors: the purity of the injected DNA, the stage of animals you inject, how many rescued progeny you get from each injection, the structure of your transgene, and if your transgene is toxic. In our hands, we routinely get insertions from > one in every ten injected animals that have rescued F1 progeny. Of these, 60 % contain full, single copy inserts. In initial experiments we suggest you inject approximately 50 animals to ensure a reasonable success rate.
Materials and equipment
• Standard injection setup: inverted microscope, injector and micromanipulator.
• Negative selection marker: pMA122
• Fluorescence dissection microscope with mCherry filter set and shutter controlled by foot peddle.
• OP50 and HB101 seeded NGM plates (small)
• 20° incubator
• 25° incubator
• Co-injection plasmids: pGH8, pCFJ90, pCFJ104
• Mos1 transposase plasmid: pCFJ601
• Injection strains
A week before injections
Step 1Maintain unc-119 animals from the injection strain on HB101 bacteria at 20°C. On HB101 plates, the unc-119 animals can move around better than OP50 so we pick a couple of adult worms to a few plates every day. That way the progeny is healthy and unstarved approximately a week later. You can also distribue eggs or L1 animals around a plate for faster propagation but we have better luck with injection animals that have not been starved and are healthy. The injection strains are distributed with an extra-chromosomal rescuing array for easier freezing and distribution but you should inject into unc-119 animals.Day 0 – Injection
Step 2Make up injection mix of:| Plasmid | Description | Final concentration |
| pCFJ601 | Peft-3::transposase | 50 ng/ul |
| Transgene in targeting vector | 10 – 50 ng/ul | |
| pMA122 | Phsp::peel-1 | 10 ng/ul |
| pGH8 | Prab-3::mCherry (Pan-neuronal) | 10 ng/ul |
| pCFJ90 | Pmyo-2::mCherry (pharynx muscle) | 2.5 ng/ul |
| pCFJ104 | Pmyo-3::mCherry (body muscle) | 5 ng/ul |
| DNA ladder | Add to total concentration 100 ng/ul |
Note: We make a 2x stock of everything except the targeting vector and the DNA ladder. That makes it much easier to make several injection mixes.
Spin all DNA preps at highest speed on table-top centrifuge before making injection mix. Spin injection mix again immediately before injection.
- In our experience, it is important to use all three co-inection markers or to substitute them with other markers at reasonably high concentrations. If you use only one marker, e.g. pCFJ90 then you will get many false positives that do not have a mosSCI insertion.
- pCFJ90 can be toxic at concentrations higher than 2-3 ng/ul. If your construct is toxic you may need to decrease concentration. We have inserted transgenes injected at 1-10 ng/ul.[/list]
Day 7: heat-shock animals and screen for insertions
Selection-based insertions
Please note that the Mello lab has developed a much more elegant selection-based protocol. See Shiriyama et al. (2012) for description.
The selection based insertion strategy relies on heat-shock induced expression of the Mos1 transposase from animals carrying an extrachromosomal array. Positive selection for transgene insertions is provided by unc-119 rescue. Temperature sensitive negative selection against animals with extrachromosomal arrays is provided by a temperature sensitive mutant allele of twk-18(cn110). At 15°C array animals move normally but at 25°C the animals are paralyzed. Regulating the temperature therefore allows you to select for insertions based on a single, expanded line of array animals.
In comparison to the direct insertion method, the selection based strategy is slower and involves more experimental hands-on time. It is also more difficult to generate a the initial transgenic line because the negative selection is not completely benign at 15° C. The strategy has the advantage that experiments are easily scaled and repetitive or toxic transgenes can therefore be inserted, which may require a large number of injections by the direct insertion method.
Planning the experiment
Using the screen based method it will take you approximately 1 month to generate inserts. Although convenient, this method will work without access to a fluorescent dissection microscope. A few days before injection you will need to pick unc-119 animals with the appropriate Mos1 insert onto RNAi plates seeded with twk-18 RNAi bacteria for injection. After injection you need to select one or several stable extrachromosomal lines and grow up a population of worms for heatshock. In our experience we get insertions on average from one in every 100 heat-shocked animals. Of these, 60 % contain full, single copy inserts. In initial experiments we suggest you heatshock a total of 500 young adult animals from two independent lines to ensure a reasonable success rate.
Materials and equipment
• Standard injection setup: inverted microscope, injector and micromanipulator.
• Standard dissection microscope.
• RNAi plates (containing IPTG) seeded with twk-18 RNAi bacteria (Ahringer library clone X-4F11)
• OP50 seeded NGM plates (small and large)
• 15° incubator
• 25° incubator
• Co-injection plasmids: pGH8, pCFJ90, pCFJ104
• Mos1 heat-shock transposase plasmid: pJL44
• Injection strain worms
3-4 days before injection: Pick worms
Day 0: Injection
Step 2 Make injection mix:| Plasmid | Description | Final concentration |
| pJL44 | Phsp::transposase | 50 ng/ul |
| Transgene in targeting vector | 50 ng/ul | |
| pCFJ70 | Pmyo-3::twk-18(cn110) negative selection | 10 ng/ul |
| pGH8 | Prab-3::mCherry (Pan-neuronal) | 10 ng/ul |
| pCFJ90 | Pmyo-2::mCherry (pharynx muscle) | 2.5 ng/ul |
| pCFJ104 | Pmyo-3::mCherry (body muscle) | 5 ng/ul |
Spin all DNA preps at highest speed on table-top centrifuge before making injection mix. Spin injection mix again immediately before injection.
Note: pCFJ90 can be toxic at concentrations higher than 2-3 ng/ul. If your construct is toxic you may need to decrease concentration. We have inserted transgenes injected at 1-10 ng/ul.
Step 3Inject 10 – 15 young adult hermaphrodites with injection mix. Older unc-119 animals are difficult to inject and have few transformed progeny because the animals are partially Egl and have low brood sizes.
Step 4Place injected animals at 15° C to recover for 1-4 hours.
Step 5Pick animals to individual plates and propagate at 15° or RT for 2-3 days.
Day 5-7: Identify transformed lines
Step 6Identify plates with F2 rescued lines. Pick an animal clonally from each plate with transformed lines onto a plate with twk-18 RNAi bacteria. Place at room temperature.
Day 8-11: Pick line with good transmission
Step 7In order to get a good selection in the next steps of the protocol it is important to have good negative selection when the animals are not on RNAi bacteria. To test this, pick progeny from each plate containing a stable line and transfer to NGM plate seeded with OP50. Place NGM plate at 25°C. After 1 to 2 generations at 25°C monitor the degree of paralysis when a stable line is shifted away from twk-18 RNAi bacteria. Stable lines that are appropriate for continuing the protocol will move well on RNAi bacteria at 15°C or RT but will be almost completely paralyzed at 25°C off RNAi bacteria. Lines with high transmission rate also appear to be better for insertions.Throughout, continue to also propagate animals from the stable line on twk-18 RNAi bacteria at RT to have animals for the next step in protocol.
Day 12-18: Pick a good line and heat-shock
Step 8Pick one or two lines that have good negative selection properties. Make a semi-synchronized population by washing off all the adult animals from one or several plates and leaving the eggs behind.Day 21-29: Propagate heat-shocked animals
Step 11Move plates with heat-shocked animals from RT to 25°C. Allow to starve.Day 31: Screen for inserts
Step 13Screen plates for insertion strains after two days. Insertion strains which have lost the negative selection array will move like wild type animals and quickly out-compete array animals. Plates with an insert are typically very obvious and can usually be identified without a fluorescent microscope. The negative selection works best on unstarved animals.Validation of insert